I was able to fly N5168V from MQJ back to EYE after the new Garmin G5 EFIS was installed. It is one lovely instrument. It comes alive as soon as the master switch is turned on, and goes through a short “boot” and self-test process. In a few seconds it displays the attitude indicator and the associated peripheral data fields. In short order, it goes through an “aligning” process and then the “real” data populates. When system power is removed (usually by shutting off the master switch), it presents a message stating that line power is lost and to continue using the device on internal battery power, the pilot must press the power button. If the power button isn’t pressed, the G5 simply powers down in 45 seconds. For pilots who prefer simple avionics, there are no additional steps for using the G5 as a simple attitude indicator. It comes on with the master and shuts down with the master.
The LCD display is crisp and bright. It is configured to auto-dim based on the ambient lighting, but it has a quick- access menu to manually set the brightness.
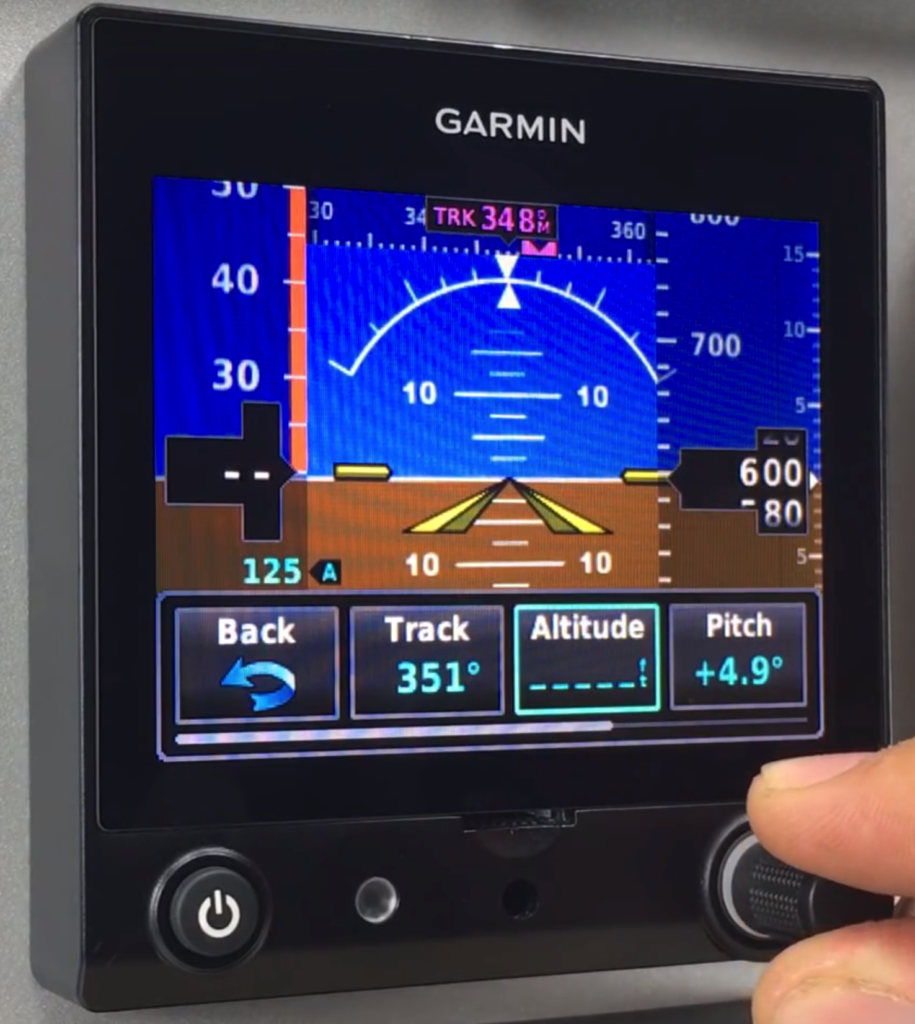
There are only two controls on the G5; the power button and the knob/ button. Normally, when no menu is displayed, twisting the knob will adjust the baro setting shown in the lower right corner.
Pressing the power button brings up the display brightness menu. Pressing the knob brings up the parameter menu along the bottom edge of the screen. Twisting the knob moves the highlight between menu items. Pressing the knob selects the highlighted item.
The options in the parameter menu are “Back | Track | Altitude | Pitch”. When “Altitude” is highlighted, pressing the knob will bring up a box that will allow the user to adjust the altitude bug. Similarly, the Track bug can be adjusted by selecting the Track menu item. It is important to note that there is no magnetometer installed for this device, so it only shows the ground track of the aircraft, not the heading. The HSI version of the G5 includes a magnetometer and does calculate the heading. The attitude indicator version that we have only provides the ground track.
The positions of the yellow aircraft “bars” on the attitude indicator display can be moved vertically by adjusting the Pitch menu item. Normally, the center point of the bars is placed on the horizon line in level cruise. The position of the horizon line will change slightly with changes in airspeed and CG, hence the option to adjust the location of the bars. That’s about all there is to the in-flight configuration of the G5. Once you’ve played with it a bit, it’s quite simple and intuitive to operate.
The image on the next page illustrates the data fields depicted on the G5 PFD page. Note that the STC version of the instrument that we have does NOT provide CDI or glide slope (VDI) data. That is only provided on the experimental version of the G5, or with dual G5 STC installations.
5168V is upgraded and N182SV is on schedule to have a G5 installed in June. If we experience an attitude indicator failure in N716CD, we will be installing a G5 in her, as well. We feel that the G5 will enhance safety, reliability and ultimately save the club money in the long run.
The Pilot’s guide is posted on the “Members Only / Aircraft Data” page of the Sky- Vu web site. Note that only the data in that manual up through page 23 applies to our installation.
Also, of importance, the vacuum system has been removed from 68V (and will be removed from 2SV when her G5 is installed). The “VACUUM” indicator lamp on the annunciator panel has been disabled, and the vacuum gauge has been permanently placarded as “INOP”.
See the revised checklist (coming soon) for items that have changed (barometer setting, no vacuum system, etc.). Also note that the weight and balance data has changed slightly and will be updated in the POH and aircraft data sheet.

Recent Comments